Tuesday 25 October 2011

Alpine Miniatures - Razvedchik, Operation Bagration, 1944

.
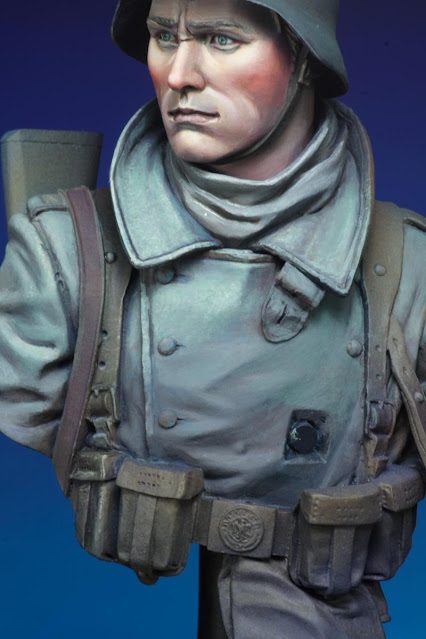
Concluding the box art assignment on the Razvedchik pair for Alpine Miniatures, here is the first installment on the low down of the painting process.


A base coat of Gunze Sanyo Flat Black was airbrushed on followed by a light over-spray of Jo Sonja Prussian Blue to cut the harsh appearance of the black.


Next, a solution of water and paint retarder was applied.


A mixture of Jo Sonja Carbon Black, Red Violet and Cadmium Orange for the brown sections of the camouflage was applied over the wet ground. The extended drying of the paint retarder solution reduces brush strokes as it allows the paint to evenly level out.


The color for the olive-green sections of the amoeba camouflage were mixed from Titanium White, Hookers Green, Cadmium Orange and Red Violet. They were painted in whilst the brown sections were wet. This not only allowed corrections to be made within a single layer, reducing an unnecessary build-up of paint, but also helped simulate both dirt and shadows in that same step. Other colors such as Prussian Blue and Cadmium Orange were also dabbed on straight from the tube and mingled in (alla prima) to create more subtle variation of tones and hues.
"Any way you want it to be, that's just right. "
Bob Ross


Notice the smooth transitional build-up of paint despite having amendments made to the camouflage pattern.


Further progress on the painting of the camouflage overalls after repeated applications. Notice the hints of blue, brown and green randomly applied throughout, adding subtle tonal variety and hue contrast to an otherwise flat appearance of a drab color scheme. I've chosen to paint the MP-40 magazine pouch in Luftwaffe Blue as a nice contrast to the olive green. Storm Blue from Jo Sonya was the perfect color for this. The Gymnasterka was painted with a mixture of Yellow Ochre, Flat Brown and Medium Grey whereas the leather belt was painted with a mix of Red Violet and Cadmium Orange.

This is all for now. Until the next installment.

Cheers,

Calvin


Tuesday 27 September 2011

IT IS A BOY!!!!!!

.
Late morning of 23 September marked the latest addition to our family, Trajan. Just when I'm squeezing more time to paint, it's back to diaper detail and baby sitting once again.


Calvin


Saturday 17 September 2011

Alla Prima (Wet-on-Wet) with Acrylic Paints

.
You might probably think that family and work has been kind to me to allow more painting and blog updates on this project. The truth is that this extra time provision has been a consequence of some revolutionary developments and revisions made to my acrylic painting techniques. Having gained some experience from using acrylic retarders, I decided that it will be helpful to formalize a short pictorial demonstration of how the oil painting technique Alla Prima or 'wet-on-wet' could be employed in acrylic painting.

 
To begin, a moist ground consisting of a 50/50 mixture of retarder and water was applied with an airbrush. This solution saturates the porous matt base color to prevent conspicuous stains to occur when the opaque colors are next applied.


Prussian Blue, Deep Orange, Flesh and Black in their original state (with no prior thinning needed) are dabbed over the moist ground. Note how the colors diffuse and mingle with each other like in water color painting.

These colors are carefully mingled together. Keep in mind that the purpose of using ingredient colors is to generate tonal variety and over working will therefore result in a flat homogeneous tone.


The extended drying time also permits the highlight color to be concurrently applied.


The sfumato effect could be created by blending the boundaries together with a dry brush (a la Bob Ross).


The finished result with smooth tonal and color transitions and the pièce de résistance, no silvering and watermarks!

I have no doubts that while some might find this relevant, my intention however was aimed towards oil and enamel painters, who at one point in time tried to make the switch but were unable to adapt to the mandates of the acrylic paint medium. Therefore what I'm hoping to achieve is to perhaps close the divide between the two mediums, expand the potential of the acrylic medium and idealistically offer seasoned oil and enamel painters another crack at painting with acrylics.

Cheers,

Calvin


Thursday 15 September 2011

Young Miniatures - Landser, Ostfront 1942

A little more work done early this week on the scarf and greatcoat.


Landser Ostfront WIP
The leather webbing was painted with a 50/50 mix of sap green and red acrylic inks over a dark blue base. Acrylic air-brush inks were used as they dried to a satin finish; aptly replicating the effect of leather. Again, a modicum of retarder was added to increase the paint's working time.
Landser Ostfront WIP
A color mixture of field grey, flesh and orange was dabbed along the edges of the Y-straps before the inks completely set to convey the effects of chafe. The slow drying also allowed the latter color to naturally diffuse and merge with the inks, creating a smoother transition of tones and values.


Texture of the woolen greatcoat was painstakingly recreated through intricate stippling. 

Calvin


Saturday 10 September 2011

Young Miniatures - Landser, Ostfront 1942

Some progress on the painting this week with more refinements added to the face and preliminary highlights and shade rendered onto the great coat.


The local color for the great coat was mixed from Flat Flesh, Scarlet, Prussian Blue, Black and Park Green (with a small amount of paint retarder added for longevity).


The ingredient colors were subsequently used to create the tones for highlights and shadows. Because their mixing ratio vary from time to time, this in part allows more tonal variety to be conveyed.


As previously mentioned, the incorporation of acrylic paint retarders allows the wet on wet technique normally associated with oil painting to be conducted using acrylic paints because of the extended drying time and the reduced surface tension. Observe that the consistency of a 50/50 solution of water and retarder is similar to that of turpentine and Liquin. It is applied as a ground prior to the application of paint.


Immediately after, shadows and highlight colors are gently brushed over and because of of the moist even ground, a soft diffused effect is naturally created without further intervention.


The final blending of colors drying to a flat finish after repeated processes.

Calvin


Tuesday 6 September 2011

Young Miniatures - Landser, Ostfront 1942

I've been fortunate this week to be granted some spare time to commence on another bust by Young Miniatures. Struck by the addictive fun of hearing the parts go "click" as they come together (a reminiscence of the Magnalock feature in Starcom toys from the 1980's), magnetic interfaces were implanted to all the adjoining components of the kit.


This has many convenient implications. For general spraying, the parts were attached to the side of a metal lid, allowing a safe distance away from the hand holding up the lid.
 
Undercoat
For detailed painting, parts were attached to a metal rod for greater flexibility and articulation.

 
Blue Ground


Local Colors 1
The overall bust was given a ground color of Prussian Blue applied with an airbrush. This is followed by orange for the face and some random areas around the great coat. Instead of unloading the orange from the paint reservoir of the airbrush, Park Green and Pastel Blue was added to create a suitable tone for the great coat.
Local Colors 2
A light mist purple was sprayed to cut the chroma of the orange.


A small amount (not exceeding 20%) of acrylic paint retarder was mixed into the paints to increase their working time. This lengthens the time frame for more colors to incorporated via the wet on wet technique. Prolonged drying also prompts the paint to spread more evenly resulting in a smoother finish. However the pièce de résistance will be its intervention in breaking the surface tension of water, greatly enhancing paint flow and adherence, reducing traces of brush strokes and water marks.


The right of the face demonstrates the smooth results from two passes of the retarder added paint over the darker ground color. The left side shows the opaque coverage obtained with repeated passes.


The opaque build up of colors, tones and shades.


The retarder also causes a slow coagulation of the paint as it dries, giving it a buttery like consistency ideal for feathering.


Calvin